.
.
.tags: fitting sleeve, tango dress, cappuccino, cabaret mesh, lace motifs, skirt yoke, four panel skirt, flesh color mesh, soldering iron, Anna Capellini ice dancer, dye mesh, dye elastic, size dresses for sale, dress photos, bishop sleeve, ruffle, rolled edge hem, lock serger blade
TOPICS DISCUSSED
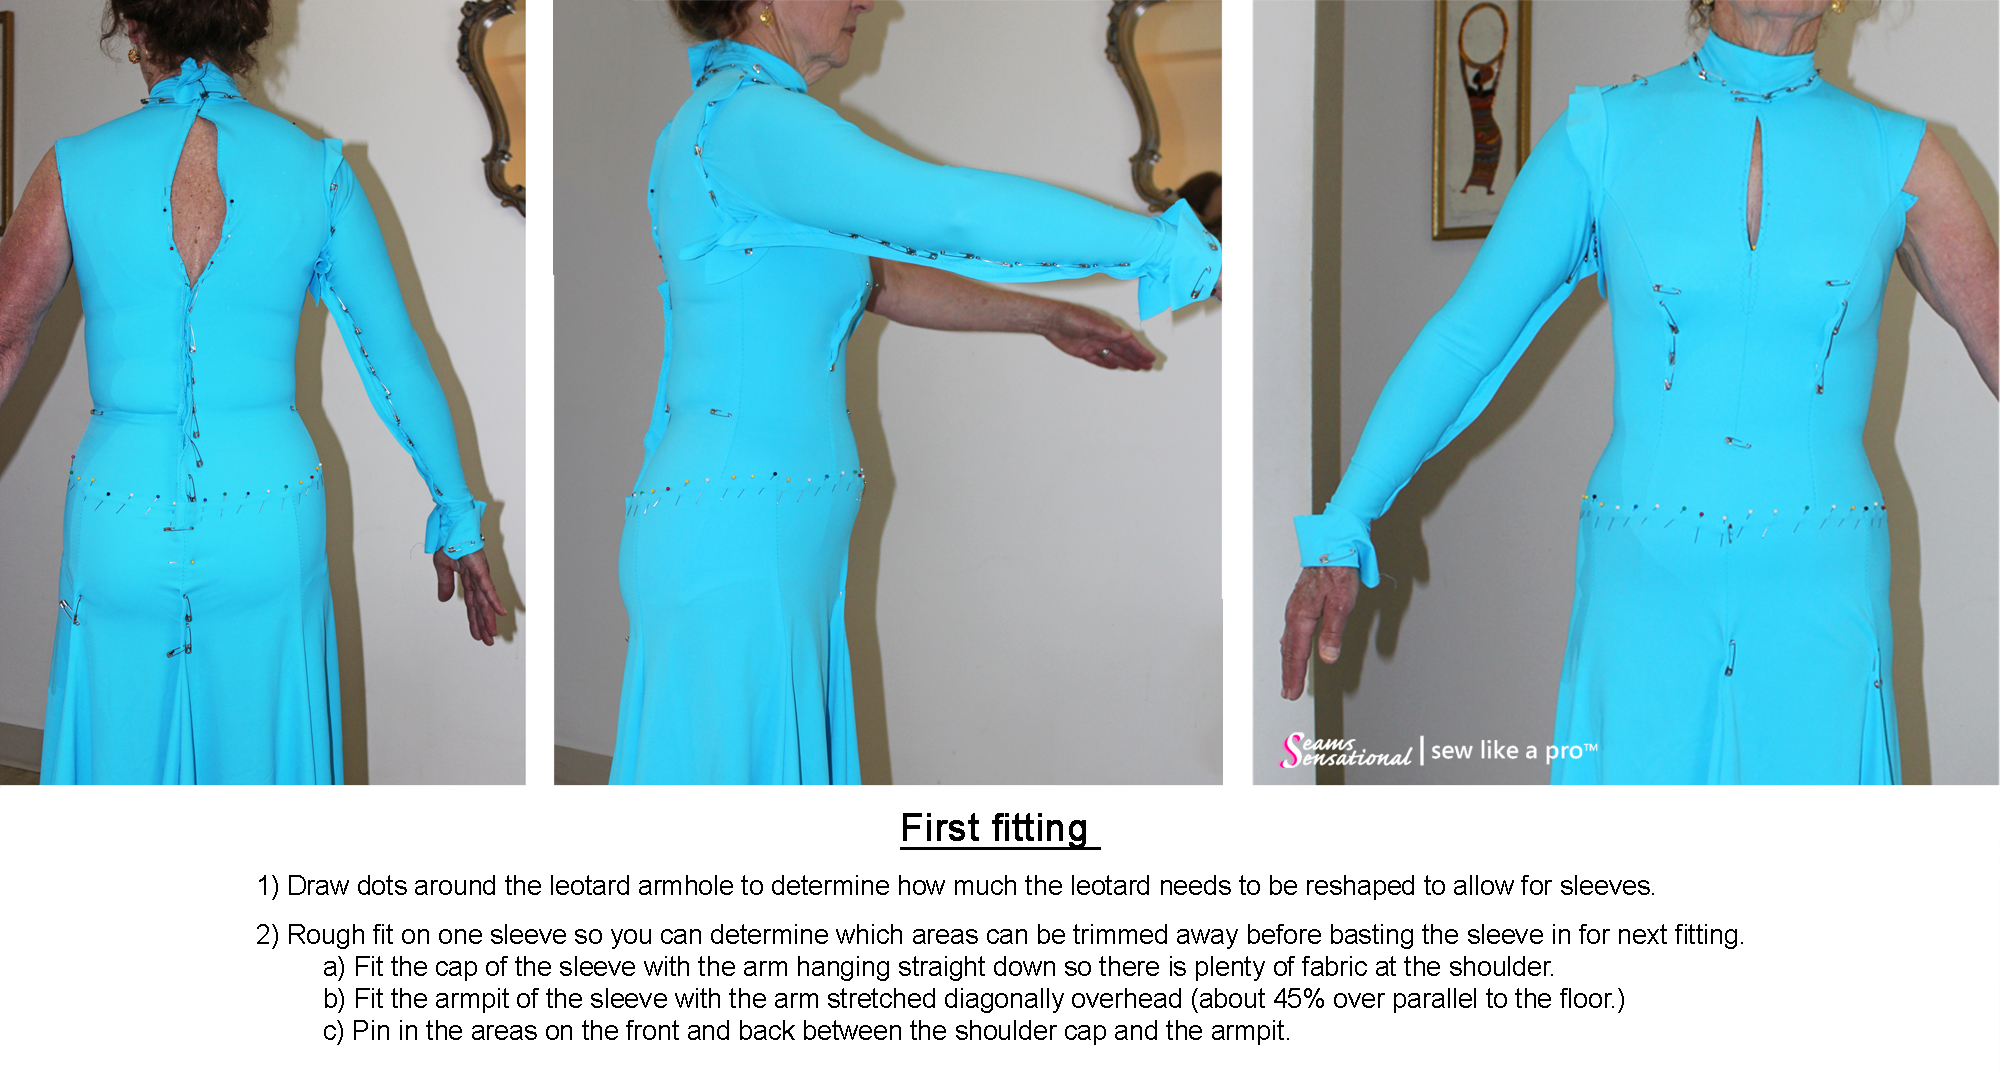
Ginny’s Q: Does the group have any tips on fitting the sleeve on myself? I’m struggling with fitting upper arm. My pattern is correct.
T’s answer: Go to Module 4 in ballgown program (module 3 in Advanced); you’ll find a bonus page that includes MORE SLEEVE FITTINGS. On that page, you’ll see an excerpt from a Q&A call about how to fit yourself. Click here for this sleeve fitting page in the Ballgown program. Click here for the Advanced Program.
P.S. I just added three more Q&A excerpts on fitting 1) leotard armholes, 2) sleeve armpits and 3) video plus tutorial photos about setting in a classic full-shoulder-cap sleeve. Check out this updated sleeve fitting page if you need sleeve training!
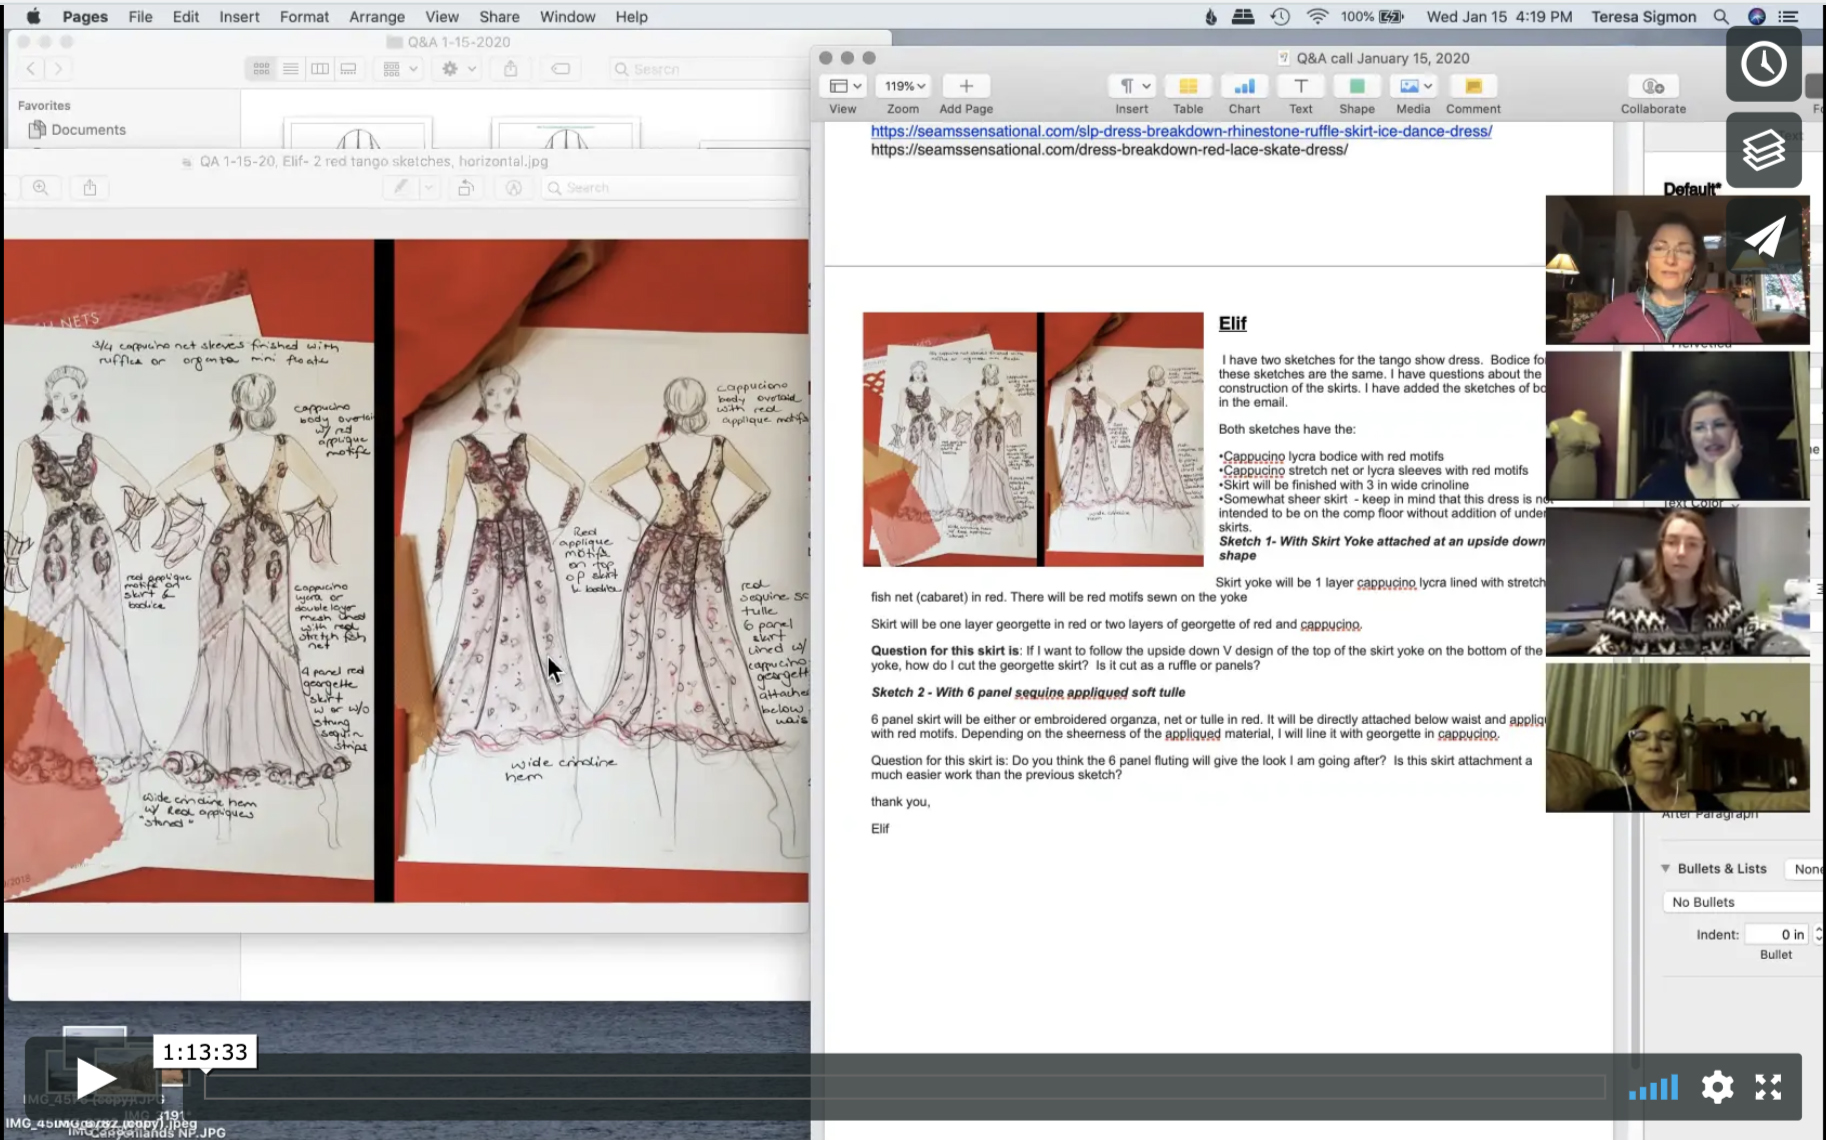
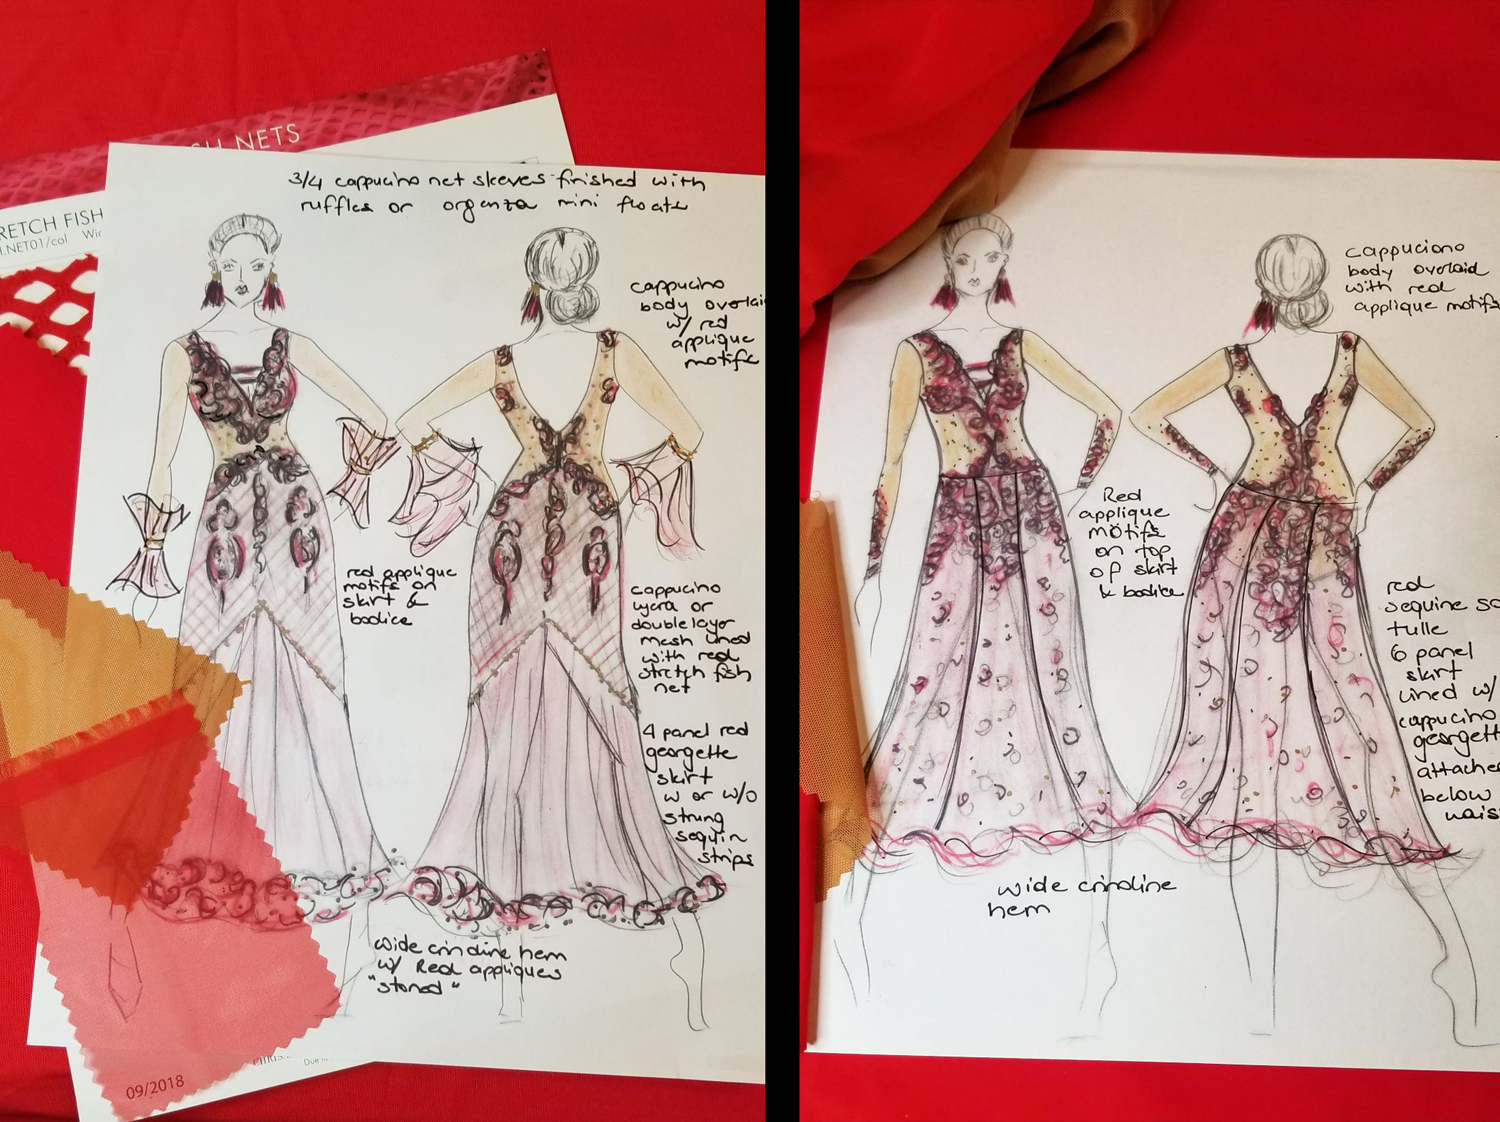
Elif’s Q #1: I I have two sketches for a tango show dress. The bodices for these sketches are the same. Both sketches have a Cappuccino (flesh tone) lycra bodice with red motifs and Cappuccino stretch net or lycra sleeves with red motifs. I have not decided whether I want to do lycra or mesh for the sleeves. The mesh on my aqua dress, with all the fittings I was doing, gave me a bad skin rash. I hope the lycra might be better for my skin. (5:30-24:25).
T’s answer: I also find stretch mesh itchy and abrasive, so I generally avoided mesh sleeves. Since you are making the bodice out of lycra, I suggest using lycra for the sleeves as well. Lycra is generally less irritating than mesh. Be sure to wash the lycra to remove all the manufacturer chemicals before cutting the bodice.
Elif’s Q #2: The skirt will be finished with 3 in / 77 mm wide crinoline, but I am not sure which skirt design I want to choose.
In the first sketch, the skirt yoke is attached at an upside down V shape and will be cappuccino lycra lined with stretch fish net (cabaret) in red. The skirt will be a one-layer red georgette, or a two layer red and cappuccino georgette.
For the second sketch (on the right), the skirt is a 6 panel sequined, appliquéd soft tulle. It will be directly attached below waist and appliquéd with red motifs (lace appliqués). Depending on the sheerness of the appliquéd material, I will line it with georgette in cappuccino. Do you think the 6-panel fluting will give the look I am going after? Is this skirt attachment much easier to work with than the previous sketch? Do you think it will flip up too much?
T’s answer: With the skirt on the left, you will have a much more tailored look, and it will be as fitted as you want to make it. The upside down V allows your legs to move a lot so you can easily take big steps like you should do in Standard and Smooth. However, it will look sleek and snug looking just standing.
The skirt on the right will be easier to make, but will look more like a classic ballgown. You can flute it to keep the skirt from flipping up. If you don’t want it to flip up much, cut it about 3″/ 75 mm in and 8-10″ /20-25 cm down. Measure the distance from your skirt attachment line to the upper thigh area (or low enough so that you will be covered when the skirt flips up), and flute the skirt that far.
Elif’s Q #3: I ordered a stretch mesh with lace motifs already on it, and was wondering if I could put it over the georgette skirt layer even though it is a stretch material. The skirt will be at least 3 inches (75 mm) above my ankle. Do you think that is short enough to keep me from catching my heel in the mesh?
T’s answer: Yes, putting the mesh over the georgette would take the stretch out of the mesh, so that would work and look beautiful! Since you will have crinoline at the skirt hem, that will further protect you from getting your heel caught in the mesh. If you are concerned, leave the underskirt about an inch longer than the mesh skirt layer, so that the crinoline layers are staggered.
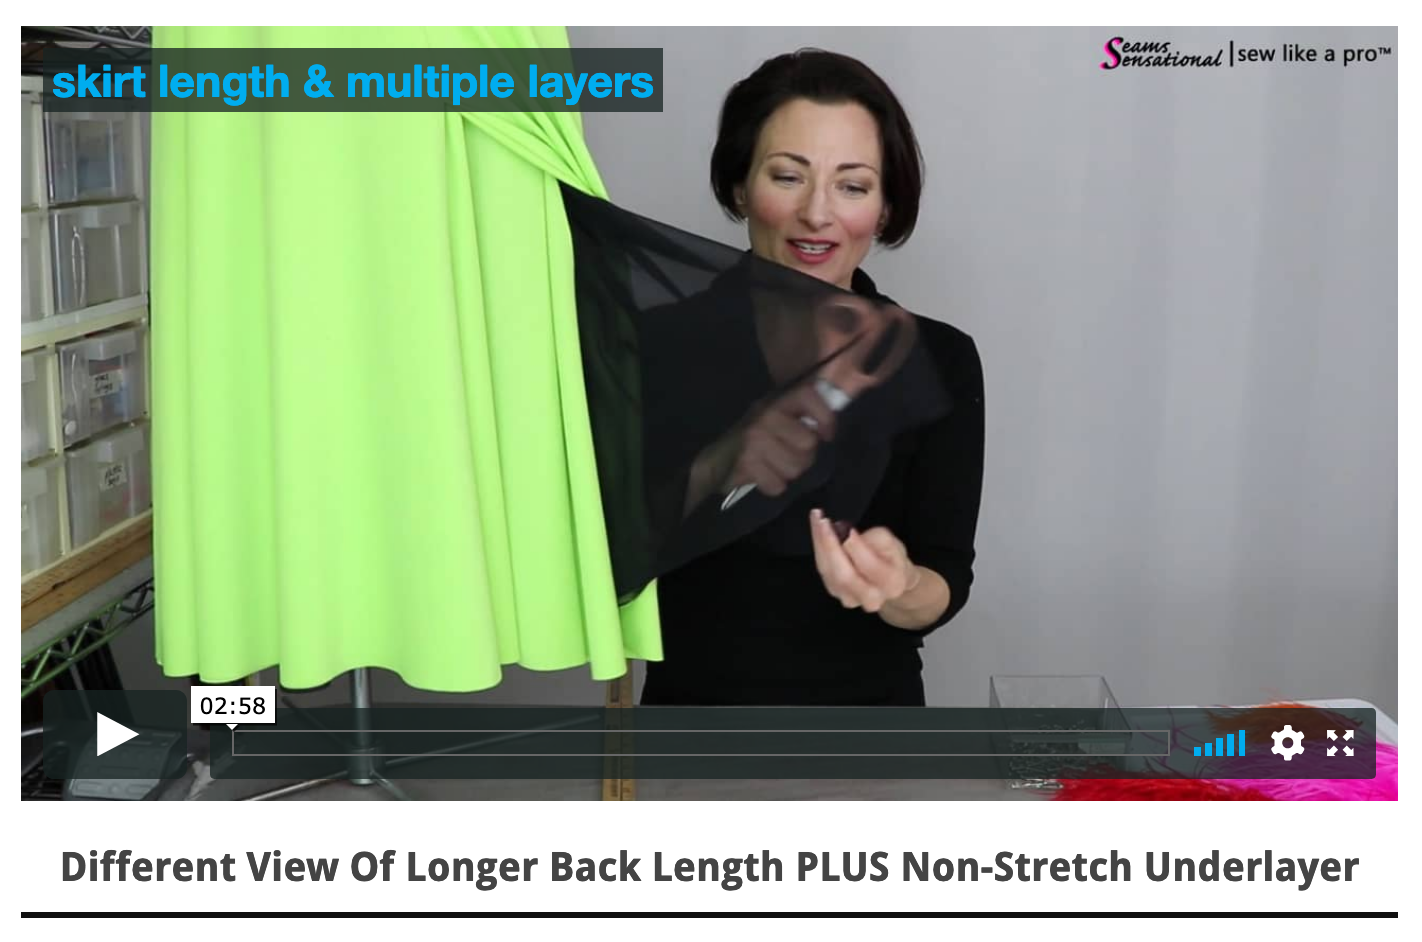
NOTE NOT MENTIONED IN THE LIVE Q&A: Watch this video that further explains how a longer underlayer can help prevent getting your heel caught in a stretchy top layer. You’ll find it in the BALLGOWN SKIRTS: TRIM & HEM page.
Elif’s Q #4: How should I attach each skirt? For the first sketch, if I want to follow the upside down V design of the top of the skirt yoke on the bottom of the yoke, how do I cut the georgette skirt? Is it cut as a ruffle or 4 panels?
T’s answer: The 6 panel skirt see on the dress on the right is an easy straight across skirt attachment. Attach it to the leotard as low as possible (4-5 inches/10-15 cm below the waist on your sketch). Then you can stitch the skirt on in one straight line in a circle. It will be sitting on the fullest part of your hips, so you don’t need to allow for any expansion other than the regular easing I mention in the attachment video. If you were stitching the skirt on higher, you might want to stitch it on at an angle like I do with Liesl’s, so that it is higher in the front than the back. This allows the leotard to retain more stretch, because stitching straight across takes stretch out of the leotard.
For the sketch on the left, you would cut off the cabaret mesh as a miniskirt. You should make the miniskirt a paneled skirt, with a seam at every point. If you have a flatter tummy, four panels with a seam down the center is fine. If you are a little rounder, you need five panels, with one panel down the front. Making the miniskirt will basically be like making a diagonal skirt attachment; only the low point or V will be rotated to the front instead of the side. Also, you do not have to make the front and back point the same height. You can make the front higher, to minimize the tummy, and make the back lower, to emphasize the bum curve.
Stephanie's Q #1: I have a question about adding a mesh neckline. I haven’t started my dress as I’m still waiting on my fabric in the mail. I would like to add a mesh insert in the plunging V. I would like to keep the look of the mesh being almost invisible, so my plan is to dye the mesh as close to my skin color as possible. Is there a way to use a single layer of mesh instead of doubling it up or using a single layer with an elastic? Anna Capellini’s dresses use mesh that almost looks invisible, and I would like to replicate that type of look. Her dresses don’t seem to have any elastic or visible bulk. (24:58-37:40)
T's answer: Anna Capellini is an Italian ice dancer who has some gorgeous dresses. I'm guessing her dresses are made with a soldering iron (also called a soldering knife) to cut the mesh. So instead of finishing the mesh with elastic, just use a soldering iron to melt the fibers on the cut edge together. Then you can stitch in into the dress like normal. I do not recommend this for large-breasted women, because it would be too much stress on the mesh and it would offer no bust support or stability. However, since you are small busted, it will work just fine for you. Without the elastic, the mesh will gape more depending on what position you are in, but it will look more invisible.
https://seamssensational.com/slp-dress-breakdown-rhinestone-ruffle-skirt-ice-dance-dress/
https://seamssensational.com/dress-breakdown-red-lace-skate-dress/
Stephanie's Q: How is the mesh such a perfect match with her skin color?
T's answer (more explanation than on the video): It is probably custom dyed. Look at the dyeing elastic module. The principles are the same.
Basically, take a small square of mesh (maybe 6x6" or 15x15 cm) and dye it, pull it out, wash, rinse, and dry it with a blow dryer. If it's not the right color, add more dye or change your color combinations to get the right tone. Keep track of your ratios until you get the color you want. Write down your dye combination so you can recreate it in the future.
Once you have the desired color, re-wet the sample. (Wet fabrics almost always look darker than dry fabrics. You want to compare a wet sample with a wet version of the real fabric to be dyed.)
Prepare 1-3 meters of white or pale tan nylon mesh so you have plenty on hand for future dresses. Prewash and dry the mesh. Do not use dryer sheets or fabric softener because they can leave an oily residue on the mesh that will negatively effect how the dye colors the mesh.
Be aware that dying several yards or meters will take double to triple the amount of time (or more dye and less time) than the little sample square took.
Prepare your dye bath and rewet your large piece of mesh. Put the fabric in the dye bath, gently stirring constantly.
Check your large piece of fabric every few minutes, comparing it with the wet sample. If it's taking more than 20 minutes to achieve the desired color, dilute more dye in hot water and then slowly add it to the fabric dye bath, stirring all the time and not allowing the new dye to touch the fabric.
Continue checking the fabric every few minutes. Pull your big fabric out of the dye bath as soon as you get close to the sample color.
Diane's Q #1: I dyed elastic a few weeks ago, both 1/2 inch and 1/4 inch in the same batch. It was the same type of elastic and the same dye bath, but one size came out tan and one came out grey. Have you ever had that happen before? (37:50-39:42)
T's answer: No, that's odd. I've never had that happen before. But don't throw it away! You can still keep the elastic and cover it in lycra for making decorative straps or bracelets.

Stephanie shared that she also had a bizarre dying incident with elastic. One side dyed a solid color. The other side dyed two-tone like you see in the image above.
Anna Marie's Q: How do you size dresses you are trying to sell that were made for you or your clients? (39:42-49:45)
T's answer: Take actual measurements in inches and centimeters. The bust, waist, hips, and height are generally the only measurements you need to list. You can sell your dress to someone who is taller and thinner, or shorter and wider, just not someone who is taller and wider. The fabric will stretch one way. Also, if you have leftover fabric you can include the leftover fabric with the dress. Finally, advertise that you can also do alterations on the dress to help it fit whoever wants to buy it.
We also talked about taking photos for the new SLP™ member professional dressmaker page on the membership website.
Candice's Q #1: I have two sketches of the dress I am designing. The first design uses mesh for the back and right arm. I would like to integrate them seamlessly as one piece if possible. However, it seems the leotard patterns I made in the Module 2 won't work for my design. In my second sketch I modified my design and changed the back from mesh to lycra. I think it's easier to make and costs less. I also changed the asymmetrical sleeve to bishop sleeves and integrated the ribbon bands as the cuffs. I want the sleeves to be soft and transparent. How do I make the bishop sleeves? (49:45-1:03:30)
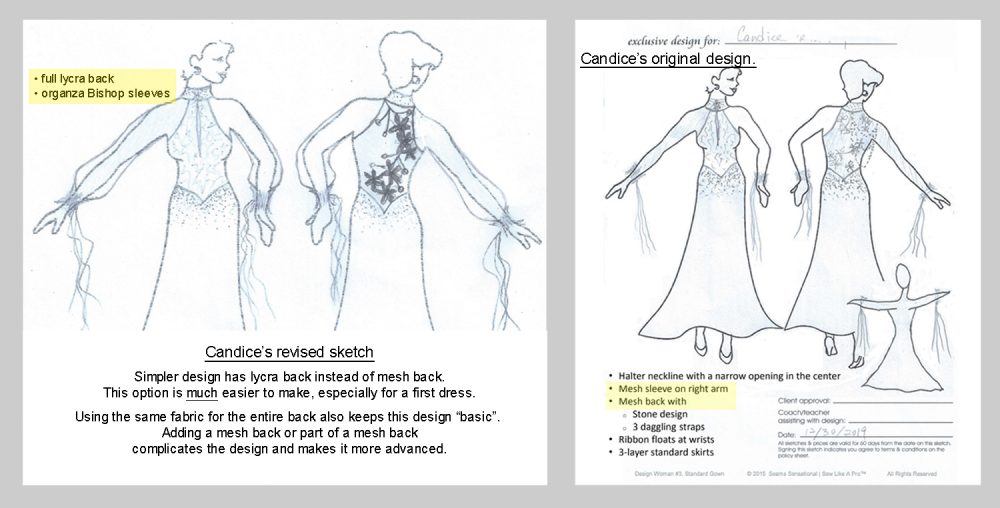
T's answer DESIGNING FOR "BASIC" OR "ADVANCED": The revised design will be much easier to make than the first. The simpler, revised sketch will save you hours of time, especially since this is your first dress.
A key component for those who are making their first 1-3 dresses, is to keep the dress "doable". By this, I mean keep the design simple enough so you more easily learn and master the dressmaking skills I teach without getting overwhelmed with complex design elements. Mastering the steps with minimal frustration helps build confidence both in your own personal ability to learn a new skill as well as in your ability to be a dressmaker.
Revising and simplifying the back of your first dress was a wise choice. Save the mesh back idea for a future dress; it will be beautiful! You'll enjoy it more after you have a few dresses hanging in your closet.
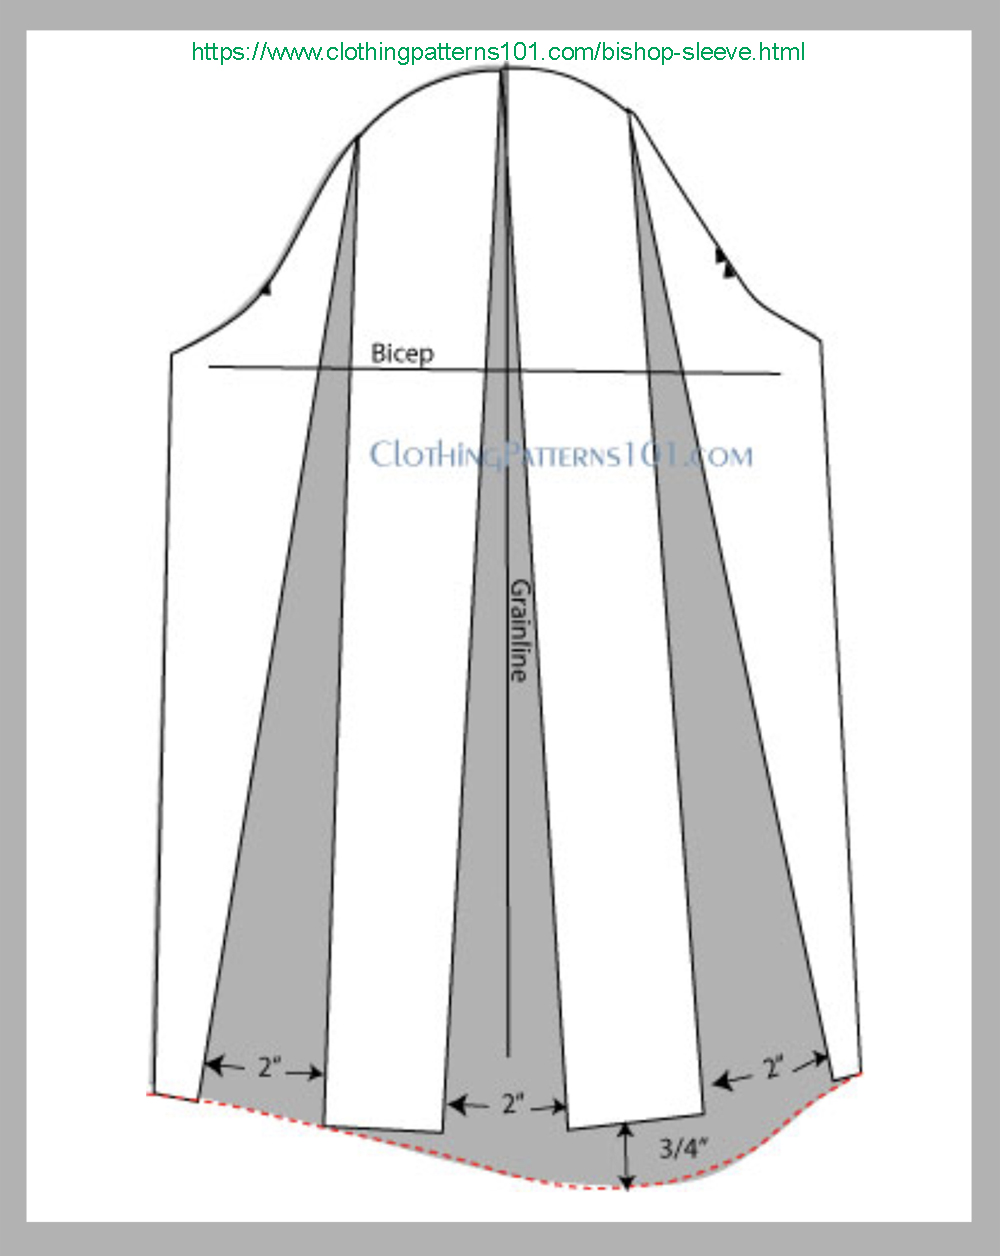
T's answer BISHOP SLEEVE: I pulled this bishop sleeve pattern off the Internet, which is basically like adding godets to a regular sleeve pattern. I recommend first making a sleeve out of scrap fabric, because you might need to alter the pattern to include more volume. You do not need to include the extra curve to go over the elbow. Also, decide whether you want a cuff or not with your bishop sleeve. You could do a rhinestoned cuff, or you could simply gather it at the bottom with elastic.
As with any street sleeve pattern, it is not cut with enough fabric in the armpit to allow you to raise your arms. Therefore, you need incorporate the SLP™ pattern for the sleeve attachment part. I did not have this tutorial photo ready for the live Q&A call. I will create a short tutorial video or an image and add it to the ever-growing sleeve bonus page in module 4.
Cindy's Q: I'm making a skirt for an ice dance dress with a two-way stretch lace ruffle, and I wasn't sure how to hem the ruffle. The embroidered lace gets worn-looking pretty quick. The ruffle is only about 2 or 3 inches wide. Should I do a rolled edge hem? (1:03:30-1:10:00)
T's answer: Yes, a rolled edge hem is the best option. If the ruffle is the length you want, see if you can lock your serger blade so that you can use your serger without trimming off any more fabric. Also, watch the rolled edge hem video in the skirt sewing module.

.
.
Search here to find information throughout the entire member site as well as public blogs.
Please leave a comment below if you have any comments or design ideas for the dresses discussed in this Q&A call.
4 replies to "SLP™ Q&A replay January 15, 2020"
Cindy’s Q about rolled hems. Sometimes I use my overlocker/serger to do roller hems but sometimes I use a rolled hem foot on my regular sewing machine using a fairly wide zig zag but shortest stitch length. I prefer this method if I’m inserting fishing line in the hem as I feel in more control.
I use my rolled edge foot and a zig zag on my sewing machine. Why? My industrial machine is a bazillion times faster than my overlock! Here’s the training on that Wendy, https://seamssensational.com/dashboard/complete-ballgown/mod8-hem-9369/#fishing-line
Stephanie’s Q1 I think Anna Capelinni’s dress may have used a fabric called illusionary. I used the ivory on my daughter’s wedding dress. It’s a finer mesh than the usual stretch mesh/net we use for dance and skate wear. It comes in white, nude, black and ivory. I’m in U.K. and got it from https://www.bridalfabrics.co.uk who also do samples. I wonder if you could try bleaching a mesh that’s darker than what you want. I’ve just successfully bleached a cream stretch mesh to ivory.
Good comments, Wendy. Thanks! Yes, I agree with your thought about “illusionary”. In the States you can sometimes find something similar to a “tricot”, though it’s very sheer. It’s usually in the bridal section here too. There is zero stretch one direction (example: side to side) and lots of stretch the other way (example: up and down).
I’ve not tried bleaching mesh. Did you notice any quality damage? Meaning did any of the elastic quality of the mesh degrade after bleaching it?